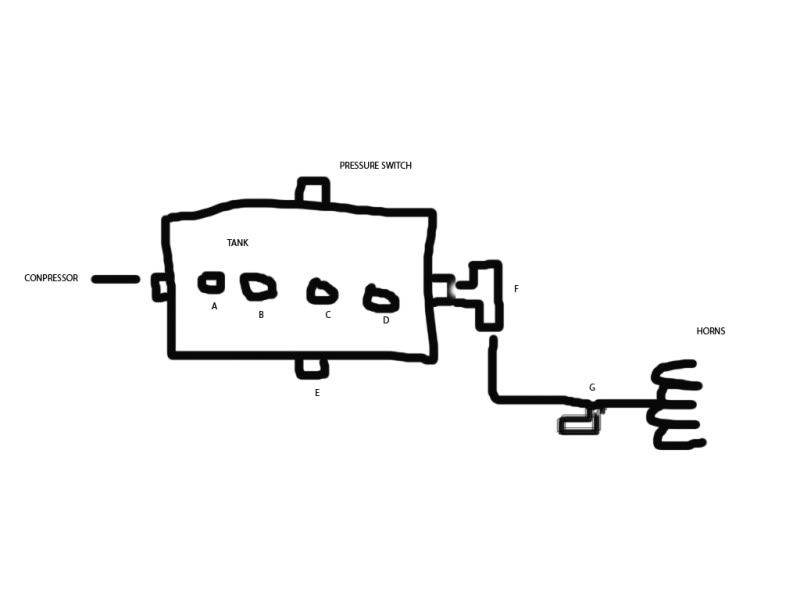
So I took the liberty of putting out my best picasso. This is what I have in mind for hook up.
So regarding F, I was thinking of finding/using a T like piece of pipe where I can run one end to the horns and the other can be a plug in type end where I could attach hose to allow for air to tires. AN good idea?
It might be easier to do a mockup when you have all of your components in hand. I have an 8 port tank, and have 2 holes plugged off. I need to get to Lowe’s to add a quick connect for an air line, something I’ve been meaning to do for a while.
Like already said, the less restrictions in your horn line…the better.
Buy your air tools at walmart and/or sears etc. locally. Get a blow gun kit, it comes with various attachments and tips. This is good for airing up air matresses, basketballs, etc. and also blowing off debris from parts etc.
IF you want to carry an impact gun, air ratchet, etc. then buy those from sears, and spend the money for the nicest ones they sell. Cheap impact guns are worthless. The impact gun is the part you’d use to remove lug nuts if you had to change a tire.
You need an “air chuck” which is the piece that you’d use to inject air into your tire. You can get a standard chuck or you can get a nicer one that has a built in tire pressure gauge right on the chuck which makes the process slightly faster.
Air tools and accessories normally do not come with quick disconnect fittings already installed. So you need to buy those seperately. There is normally a pack of quick disconnect fittings with 4 male and 1 female fitting. The female goes on your tank and the male ends go on each of your air tools.
Then you need an air hose of some sort. I recommend a flexible rubber one OR a yellow coiled plastic one. I found a nice smaller coiled hose at autozone. The air hose also needs a male and a female quick disconnect fitting installed on it and they normally do not come with them.
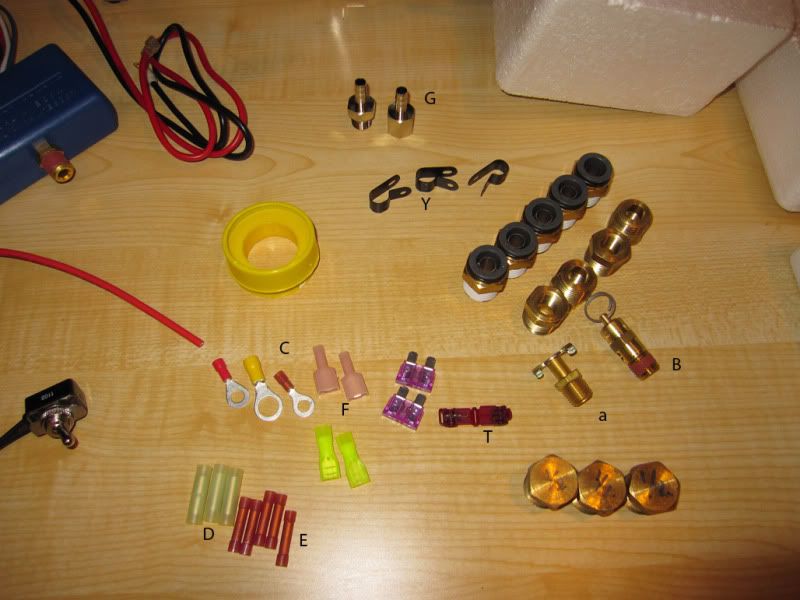
A is a drain cock, goes on the bottom of the tank.
b is pressure safety switch, it can go on any port.
c) are ring terminals (sometimes called eyelets). pink/red are for 18-20 gauge wire (thin). yellow are for 10-12 gauge wire (thick). Blue (not pictured) are for the most common wire gauges 14-16 which is what you’d use for most of your wire runs.
D and E are different gauge connectors that you use to connect one piece of wire to another with. For instance the wires on your compressor need to be connected to other wires, you’d put one of these between the two wire pieces and crimp them together with a crimp tool.
F appear to be male and female shielded quick disconnect terminals, they fit together and make a connection that can easily be unplugged while still protecting each of those wires from shorting out while disconnected due to the shielding plastic.
T is a t-tap, you crimp it onto the middle of an existing wire, and then you crimp another fitting onto the end a different wire that you’d like to connect to the first wire, and connect the two together. Then you just plug the second wire onto the t-tap on the first wire.
Y are just wire routing tie downs. you use them for cable management.
BTW can somebody clear my account for active posting that doesnt have to be reviewed by a moderator each time I reply? This time delayed moderator approval is gay as hell. If this is the way it’s going to be I’m not going to fool with posting here anymore.
My tank is 5 gal. Plan is to put a 5 chime in an Altima with manual valve.
Then I have another 2 horns. Looking to acquire a 3rd to fit into a new Honda SUV. The Altima will come first. Once I perfect that, I would like to do the 3 bells in the SUV with maybe a pancake like air tank and plumb for air, thereby negating carrying around the spare. Hardest part in the Pilot , IMHO is burying the air line within the cabin for a manual valve.
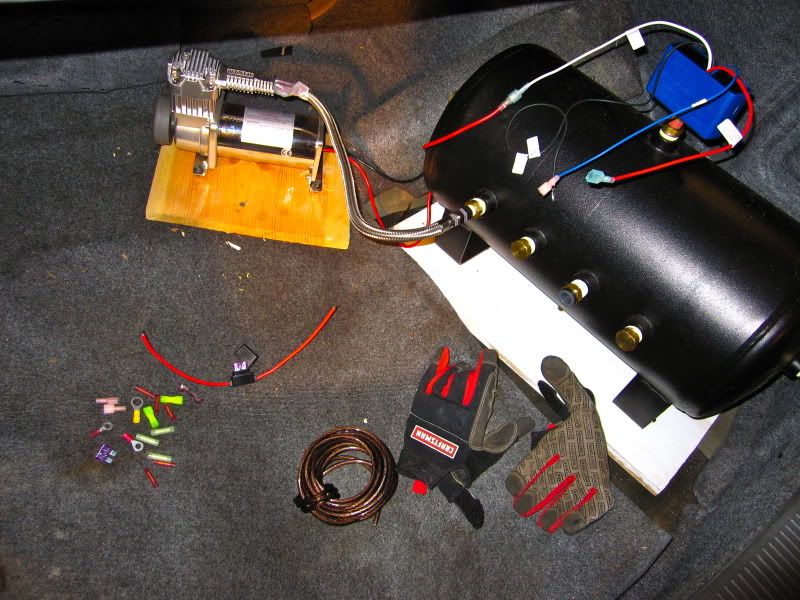
Looking at the above link as well as my photo, can you please advice what exactly I need to do to wire from the pressure switch to the batery? I think I have all else figured out.
in my photo, am I connecting the red wire off the press switch to the red wire connected to the black fuse box, shown jsut below the wood on the compressor in my pic? and then, from that red fuse box connector thing, am I to run that thick coil of wire to the battery? And further, do I just use any of those connectors to get 'er done?
-next, what does the blue wire from the pressure switch go to?
-the black, again, is ground, so just to the car body floor?
And here is where I plan to cut into the floor of the wheel well and place the horns.
I drilled some starter holes and then took a sawsall to it. Started to cut through the metal like butter but I didnt want to attract more attention tonight as my one neighbor is a nosy nut.
Excited. THanks for the tips! Hoping to complete this weekend and then finish off with a growler of double IPA
It’s coming along there. Connect the inline fuseholder directly to the battery. Then run your heavy wire between the fuseholder and the red wire on the pressure switch.
Most of those connectors should work. You’ll need a couple ring terminals and some butt connectors.
The blue wire needs to be connected to a “key-on” positive source. If you want a master shutoff switch, splice a toggle into this wire.
Yes, grounds go to the body or frame. Make sure it’s bare metal by sanding/scraping/whatever.
The blue is the trigger wire for the compressor relay in the pressure switch. So don’t use a taillight - the compressor would only run when you step on the brake. lol You want to connect to an ignition source. Something under the dash or in the fuse panel that only has juice when the key is on. You might have to use a voltmeter or test light to find a location.
FYI - this wire carries very little current, so you can use a lighter wire.
You can buy a ‘fuse tap’ to hook into your fuse panel.
Still waiting mod approval of my last 2 posts. With over 50 posts, I wonder if this is a snafu.
Anyway, I just realized that the local sears hardware had metal strips while I just bought (WINNING!) But please advise on threading…
edit: ok, my last post is in forum heaven…
http://www.hornblasters.com/installs/image/?1554 I saw this image. I think I may need to resort to doing this at some point. Question is, I got a metal strip from a local sears hardware. I gather I have to drill the 2 side holes for the horn mounts but not sure what holes or how to ‘thread’ in order to get airline in there.
There aren’t any posts in this thread waiting for approval - so I’m stumped there.
For the threaded hole. Notice in that pic - the aluminum bar is probably 1/2" thick. It has to be thick enough for proper thread engagement. To make the theaded hole you would need a tap & die kit. Some come with the drillbit for the pilot hole as it is a very specific size. Youtube has some how to videos.
Weird. When I initially wrote #16, I got a message that it would not be posted w/o mod approval. Happened twice since the forum came back up.
thanks for the info. Just put the air valve in on the pax side tonight. Used 2 carriage bolts into the internal plastic fascia. Its not great but its a good temporary start.
Hope to do the wiring tomorrow and then just cut through the wheel well floor and stick those horns out!
last wire to hook up was the the blue, that is, the trigger wire for the compressor relay in the pressure switch; touched it to the cigarette lighter a few times and heard the compressor come to live.
It started to pressurize and then it stopped. Not sure what to do.
I have a 2nd cigarette lighter in the car that I touched the wire to as well to see if the compressor would turn on and it did (so I assume its not the compressor.) But then as the compressor turned it, it worked for a few seconds as well and then stopped.
So both times I used 2 different cigarette lighters and they worked for a moment and stopped. What am I doing wrong please?