I'm back!!!!! Install on my GMC Denali

Well folks, I have SORELY missed my P3’s. I decided to change things up after buying a new house…so I sold my Trailblazer SS, and obviously kept all of my equipment.

I bought this GMC Denali a few months back. I tinted the front windows to match the rear factory tint, added Cadillac ESV 22" wheels (since they look factory), and the only other mod I have planned was the horns. One day anyways.

Today was the day. I finally gathered my parts for my pump together, since I decided to take it all apart to figure out why it wouldn’t work (it stopped working the week I sold my truck). Packaged it all up and sent it to Viair, who found the stainless braided feed hose had a stuck check valve. They replaced the exhaust manifold which was also stuck, and removed the broken bolts from the cap with the brushes (the loooooong bolts that go through the magnet cylinder broke off). Viair fixed the pump in a couple of days, and shipped it back. Their customer service is SUPERB. Soooooo, been waiting to kick the flu for 5 days. Today, December 21st, 2013…in NC, it was over 70 degrees.

The truck…

Excuse the mud. I went to a national motocross race a couple weeks before selling the Trailblazer, there was near flooding conditions at the track…as you can tell.

First things first, spare tire removed…and I had to remove the spare tire holder to get enough real estate to work with.

Tank bolted in place, pump hanging temporarily to test fit…

Took a break from being upside down, wired in my switches. I decided to wire this like my TB, so I used a toggle switch for compressor control (I control the supply to my Hornblasters pressure switch), and a momentary button for my horns…both switches control the ground side of the circuit. The momentary button had tiny terminals, so I soldered them.

You don’t realize how dirty your vehicle is until you take pics like this! Switches all mounted, I can close the lid to conceal them.

Horns ziptied in for final test fit, they are now bolted in place. I actually have a u-bolt going around a cylindrical lateral subframe connector, couldn’t be any more perfect for this application.

Update: 12/31…Finally got a little video today!

http://www.youtube.com/watch?v=lIMOPTUJq-I&feature=share&list=UU2bBTJBP3oLYjGBObYG8Gww

Nice truck - nice install. How low does it hang? Can you see anything from the rear?

I still need to button up a few things for the final touches on it, I’ll get some overall pics of the truck. :slight_smile:

Here is a straight on view of the back…nice and stealth. :smiley:

I brightened this one up a bunch. If you look at the license tag, there is the parking distance sensor just below the tag to the left…you can see part of a bell of the Nathan’s. If if you were behind me in a car with some good headlights, you wouldn’t be able to discern that bell. :slight_smile:

Awesome! I’m also in north carolina. I wonder if your close. I’m near the state line on the beach! (sc state line)

How loud is your compressor on the metal like that? I had mine on my frame and it was soooo loud!

I wondered about that too, but I checked the plate I mounted the compressor to…and it was very sturdy. When I mounted the compressor, I made sure to get it as square as possible…to effectively use the rubber mounts. Guess it worked out well, the only noise I heard is from the compressor motor itself…no resonance from the vibration. :slight_smile:

Yikes, I can’t imagine giving up my spare for a second horn. I say this as someone running 34’s toting a matched full-size spare (which is apparently unusual, as so many lifted trucks with big tars around me lug their OEM spares … which is a complete waste since they can’t use it).

There is a pile of other usable space under a Silverado/Sierra … so I’m baffled when I see horns in a spare tire location. Is it a matter of avoiding fabrication work, or do you carry your spare in your bed, or what? (And if you carry no spare, what is your plan for when you get a flat?)

Also, you have another North Carolinean, here – I’m close to Roxboro, NC. :slight_smile:

I’m in Raleigh. Moved from Michigan about a year ago. Saab 9-3 with shockers.

I’d love for you to show me where this generous space is underneath my truck. :smiley: There really is no space, maybe mine is a little different with the exhaust since I have a 6.2L…versus the 5.3 and 6.0 trucks. If you want trainhorns on a Denali, there is no other choice. The 5 gallon Hornblasters tank and the Nathan P3’s consume quite a bit of real estate by themselves.

In my profession, I have a lot of resources around town…no worries if I get a flat. I do have a full set of the OEM tires/wheels in my garage, and the spare itself…in my garage. On top of that I have AAA. Its worth the bit of effort to grab a spare from home…to have the trainhorns. :smiley:

Nice! The furthest I get out in Raleigh is Brier Creek or the area of the airport. What color is your Saab? If you see me around (which would be on the weekends), give me a blast. :slight_smile:

Added video to the original post, but here is the link for the bump. Finally got a little vid to show…

http://www.youtube.com/watch?v=lIMOPTUJq-I&feature=share&list=UU2bBTJBP3oLYjGBObYG8Gww

Vertical space to accommodate the diameter of the 5gal tank is an issue, specifically because it’ll hang down too low in most mount locations. However, there’s plenty of length and width around the truck … allowing for the use of long, skinny tanks, pairs of skinny tanks, etc. A pair of 2.5gal or 3gal tanks could easily be mounted inside the rockers (one on each side of the truck). There should also be space for twin 2.5gal’s or twin 3gal’s in extended cab and crew cab trucks – directly beneath the feat of the passenger that would sit behind the driver. (At a minimum this is true for the 99-07 NBS trucks, as I’ve got twin 2.5’s in this location … inside of a protective steel carrier fabricated for the purpose.)

As for the Nathans, separating them from the manifold and fashioning your own which allows for independent mounting should allow you to place them behind grille, aimed down; I have my shockers there and if I didn’t have a WARN hidden winch kit I would have plenty of room for more in the way of horns in that location.

Heh! I’m not trying to give you any grief, but I suppose I just don’t understand the idea of skipping extra forethought and installation effort in order to defer that effort to a time of need – and shift the effort to a buddy you have to call or a service like AAA you have to pay for. That’s basically what I perceive most folks to be doing when they give up the spare, since I know there are other locations and means for mounting on these trucks, though I can’t speak directly for the 6.2L. That’s just a foreign idea to me in a scenario where you can have your cake and eat it, too.

In this case, if extended or crew cab Silverado/Sierra owners think outside the box when it comes to the installation, they can have 5+ gallons, train horns, and a spare … and lose no cab or truck box space. It just takes a bit more planning and install time.

It’s one thing to say there isn’t space for an installation when there truly is none … and completely another thing to say there isn’t space when, really, there is space and folks just aren’t interested in going through the extra effort required to use that space. Good choice of components to fit the space you have is, obviously, a key factor. I’s understood that some folks may be forced by budgetary constraints to select less than ideal components for maximizing available space, as well (… but I wouldn’t expect someone driving a Denali with a personalized plate to be in that boat :)).

Dang, the airport and Brier Creek are about as close to Raleigh as I tend to get. There are, however, enough of us in the area that it might make sense to do a meet-up sometime. Photos of installs never do them justice (and I’ve been too busy with the house to get mine posted, meh)… plus people probably have some funny stories. :slight_smile:

To each their own for sure. I am all for simplicity. With the installation I have, its just as easy for me to take off in a couple of hours…and return to 100% stock. I’m not going to invest anymore than I already have into this setup either, everything is still in 100% working order as I purchased it all brand new (except the horns) several years ago. Plus I don’t want to hack up my truck, and put any holes or add any hardware in it. A spare tire is my last concern.

I’d be down for a meet as well, you should post something up in the SE forum to gain some interest. Not sure how active folks really are around here, it’d be interesting to see the turnout…

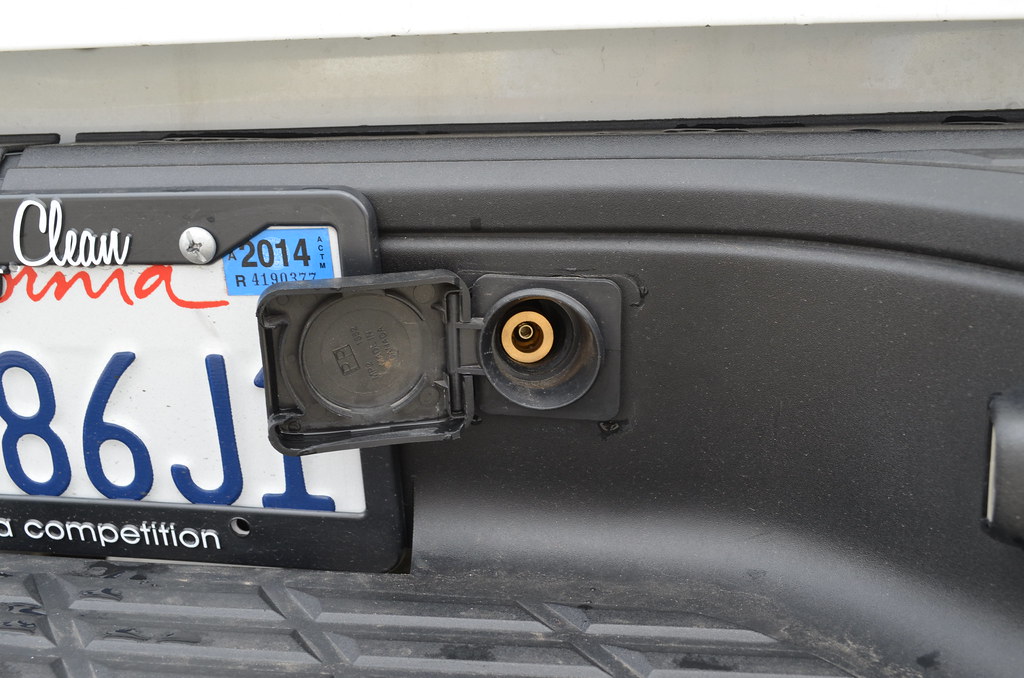
I mounted mine the same exact way back in the day except I put my compressor against the frame rail and mounted my Shockers behind the front grill. If you want to add a relocation kit, I suggest putting the quick disconnect where the spare tire key goes in the bumper. Thats what I did any it looks sick! Pop the cap, and boom instant air waiting for you.

Thats a good idea! Got any pics?

I like his idea, too – but I run with a full-size spare so it’s a non-starter for me. In case you’re interested in other options – I’ve got a pair of QD’s … one mounted on the rear bumper supports near the rear (driver’s side – away from exhaust) corner of the truck … and the other on the driver’s side of my WARN hidden winch carrier. Neither are visible unless you’re at eye level with them, yet both are readily accessible (and have dust/debris caps). Had I not had the winch carrier I’d have placed the front QD near the driver’s side tow hook – behind the bumper skirting via one of the supports.

That is a pretty slick idea if not running a spare.

Yeah I’m considering fabbing up a solid QD to come right to the lid/cover for the spare tool access near my tag, then I can stow the coiled hose where my tire tool kit is/was in the cab. Looks like it’ll be my next project. :smiley:

VERY Clean and not detectable. Left a little slack on it so i just stick my pinky in the hole. pull it out and hook on the accessories.

1 Like

wow.

I don’t know if that location would work on my truck. Mine is a locking “plug”. That is a good idea though.

I’d love to see a video of a QD connection being removed/unlocked from that location. A single video, no practice/test runs to perfect the methodology, just shoot and disconnect a line.

Why? Because with that amount of recess it looks like you’d have to fiddle with the QD (a lot, each time) to unlock it, which would get annoying very quickly. However, that’s just my mind at work – and in practice it could be a non-issue. Hence – desire for a video.